Basic Android App Building: Architecture

Spending a year and a half re-educating myself as a Cognitive Scientist / Ai Engineer.
I've been learning Kotlin for Android App development for a few months now. I thought I would make some notes on what I've learned about the basics of app archecture so far. From what I understand, Jetpack Compose as it stands has moved android development - and app development in general - forward by providing more architectural integrity.
What this does is simplifies projects and makes them easier to understand. Assumedly this is because app projects can grow to a size that quickly becomes While I hope this is useful to someone else out there, I mainly wrote it to get these initial concepts straight in my own head.
Once you've been using them for a while, they are highly intuitive and sensible, but in the beginning, it all looks a bit like Greek. Anyway, here it is, an introduction to basic android app architecture in jetpack compose.
Using ViewModels
A ViewModel manages the interaction between the data layer and the UI layer.
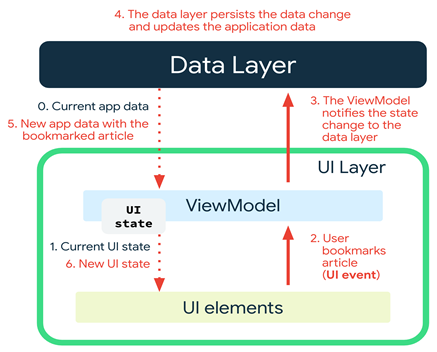
The UI layer comprises the screens we make up with Composables.
So for each screen, we'll need a ViewModel to interact with any data sources (see next section). Think of it like an interface for a UI screen to interact with the data sources that inform them.
Each of our screens will need to interact with our Todo-repository, so the ViewModels will need functions to access this.
Navigation Between Screens
The navigation component consists of three parts:
NavController: navigates between destinations (screens)
NavGraph: Maps composable destinations to navigate to
NavHost: composable acting as container to display current destination of NavGraph
Step 1. Define routes to destinations
A route is a string that defines a destination.
Create package 'navigation' and <app>screen.kt file
Define Routes. List destination names as short strings, e.g. Main, GoalEdit, PaymentScreen, etc. In <app>screen.kt file:
enum class <app>Screen() {
    Main,
    GoalEdit,
    PaymentScreen
}
- Add NavHost.
Initialise navController, e.g. in main App composable:
@Composable
fun InventoryApp(navController: NavHostController = rememberNavController()) {
    InventoryNavHost(navController = navController)
}
Step 2. Add NavHost composable...

Add some potential routes to the NavHost.
NavHost(navController, VoxPlanScreen.Main.name, modifier = Modifier.padding(10.dp)) {

        composable(route = VoxPlanScreen.Main.name) {

        }
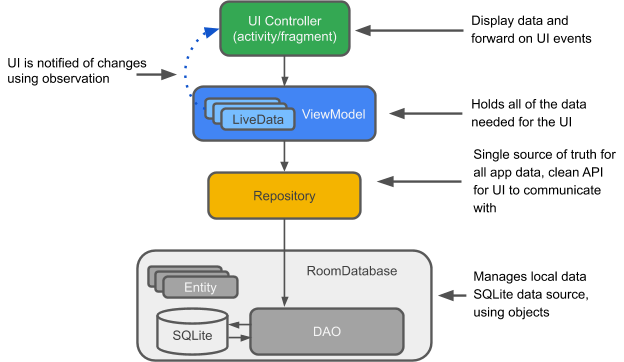
Basic Room functionality
Room allows us to store data in our app.
There are a few components required here:
The Database itself. It needs to be created somewhere and once created, our app needs to know how to access it.
The Data Access Object (DAO). This is like a translator between Kotlin function names, and database access operations, i.e. reading and writing.
The Repository. The repository is itself like an interface between the ViewModel and the DAO/Database.
Dependency Injection
Once we've created a database and made it workable, we need to protect it against bugs and errors. For example:
Making sure only 1 database is created and used
Preventing different parts of the app from doing different things to the database at the same time
For this we need to inject the database as a dependency into the places where it's needed, i.e. the ViewModels we are using to manage the interactions between the UI screens we're creating, and the database.
Creating an Application Container & ViewModel Provider
AppContainer: Why?
Creating an App Container class allows you to set up the initialisation of dependencies when the App first starts, and creates a single point of reference. We can then inject the dependencies into their required locations as needed from this single source.
ViewModelProvider: Why?
Creating a View Model Provider Factory centralises the logic for creating View Models throughout the App. It gives us a single point to inject dependencies into our View Models from.
- Create an AppContainer class in your <data> directory. Create an interface which defines the dependencies to inject. Create a class that implements them. Below we are defining a Room database and a repository for that database.
interface AppContainer {
    val database: AppDatabase
    val todoRepository: TodoRepository
}

class AppDataContainer(private val context: Context) : AppContainer {

    override val database: AppDatabase by lazy {
        Room
            .databaseBuilder(context, AppDatabase::class.java, "todo-db")
            .build()
    }

    override val todoRepository: TodoRepository by lazy {
        TodoRepository(database.todoDao())
    }

}
Note we are receiving the Context as an argument.
- Name the application so it knows where to look for its container. In <AndroidManifest.xml>, in the <application> section:
    <application
        android:name=".VoxPlanApplication"
...
- Create an <App>Application class that implements Application(). This will enable us to inherit and override the Application's onCreate() function, thereby setting up the container when the App starts:
class VoxPlanApplication: Application() {

    lateinit var container: AppContainer

    override fun onCreate() {
        super.onCreate()
        container = AppDataContainer(this)
    }
}
Note that we are feeding the AppDataContainer class the context (this) of the overall Application, so it can be used e.g. by the Room database (see above).
- Create AppViewModelProvider, and the CreationExtras mapping function.
import android.app.Application
import androidx.lifecycle.ViewModelProvider
import androidx.lifecycle.viewmodel.CreationExtras
import androidx.lifecycle.viewmodel.initializer
import androidx.lifecycle.viewmodel.viewModelFactory
import com.voxplanapp.ui.main.MainViewModel

object AppViewModelProvider {

    val Factory = viewModelFactory {

        initializer {
            MainViewModel(voxPlanApplication().container.todoRepository)
        }
    }
}

fun CreationExtras.voxPlanApplication(): VoxPlanApplication =
    (this[ViewModelProvider.AndroidViewModelFactory.APPLICATION_KEY] as VoxPlanApplication)
Note we are only referencing one ViewModel at the moment, but we will be adding more later.
The extension function voxPlanApplication() creates a link between the Application and the VoxPlanApplication class, allowing us to reference it through the voxPlanApplication() function. It provides a convenient way to access the custom Application class within the ViewModel creation process.
- Initialise the ViewModel as an argument to your Composable screen function, rather than in the function's body:
import androidx.lifecycle.viewmodel.compose.viewModel

fun MainScreen(mainViewModel: MainViewModel = viewModel(factory = AppViewModelProvider.Factory)) {
    ...
}
This will initialise the View Model the first time the Composable is run, without any risk of re-running the same code.
Note:*This was the source of an error in my app at first. Because I was initialising the ViewModel inside the Composable function, every time the uiState was updated and the screen was re-composed, it would enter into a loop where the View Model was re-created, then updated again, causing the screen to flicker.*
Original code that caused the error:
fun MainScreen(appContainer: AppContainer) {

    val mainViewModel =
        MainViewModel(appContainer.todoRepository, ioDispatcher = Dispatchers.IO)
    ...
}
Flow and StateFlow
A Flow is a data stream that can 'emit' multiple values over time. Useful for exposing data from repositories.
Right now, our Todo Repository is emitting a Flow:
class TodoRepository(private val todoDao: TodoDao) {
    val allTodos: Flow<List<TodoItem>> = todoDao.getAllTodos()
...
}
A StateFlow however is somewhere between a Flow and a State. It emits new states (not just values) and maintains a replay cache, making it ideal for exposing data that needs to be accessed from multiple screens or composables.
Implementing StateFlow:
- Expose data from repository as a StateFlow (change from value to function too)
fun getAllTodosStream() : Flow<List<TodoItem>> = todoDao.getAllTodos()
- Provide access to the data as a StateFlow in the ViewModel.
First, create a data class for the StateFlow:
data class MainUiState(val todoList: List<TodoItem> = listOf())
Then, use this class to collect a StateFlow in the ViewModel:
class MainViewModel (
    private val repository: TodoRepository,
    private val ioDispatcher: CoroutineDispatcher
) : ViewModel() {
    // this is a StateFlow of items from the repository
    // map wraps each element from repository's Flow<List<TodoItem>> to MainUiState
    // .stateIn maps List of MainUiState to a StateFlow<MainUiState>

    companion object { private const val TIMEOUT_MILLIS = 5_000L }
    val mainUiState: StateFlow<MainUiState> =
        repository.getAllTodosStream().map { MainUiState(it) }
            .stateIn(
                scope = viewModelScope,
                started = SharingStarted.WhileSubscribed(TIMEOUT_MILLIS),
                initialValue = MainUiState()
            )
...
}
- Collect the StateFlow in your UI composables
@Composable
fun MainScreen(context: Context, appContainer: AppContainer) {

    val mainViewModel =
        MainViewModel(appContainer.todoRepository, ioDispatcher = Dispatchers.IO)
    val mainUiState by mainViewModel.mainUiState.collectAsState()
...
}
I think that's it for some basic Android App Architecture. Since writing this article I've learned a fair bit more about Kotlin and grown to love it (at the time of writing I wasn't sure still :D). It's a modern language with an intelligent editor (the Jetpack Compose Android Studio) that just seems to make sense.
Bear in mind my original programmer's education was mostly C++ and Java, fantastic languages, of course, but somehow always seemed to be overly complex to my mind.


